WordPress is one of the easiest platform when it comes to creating new websites and blogs. Since its inception in 2003 it has become the largest self-hosted blogging tool in the world. The reason it is easy to use is, there are plugins (free and premium) for everything. WordPress plugin repository has over 40,501 plugins available, which are uploaded by people like you and me, who find a need to solve some problem and create a plugin for that. Each plugin has a custom functions and features that allows its users to tailor it according to their needs.
Creating your first WordPress Plugin can be both a exciting yet intimidating at the same time. If you think your plugin will solve it’s users problem then you should go for it. Creating a plugin is a great way of giving back to the open-source community and that also gives you an opportunity to showcase your work.
When me and my co-founder (and husband) Himanshu Patel, launched LnkSocial.com, our users started growing and we were overwhelmed with the number of articles we were getting in the platform. That’s when we found the need of creating a WordPress plugin for it so that its easier for our users to submit articles.
Overview About LnkSocial.com
LnkSocial is a free platform which lets your submit your content to the platform for pre-defined credits (can be earned by sharing other posts from LnkSocial). When you submit a content to LnkSocial you provide your content an option to be distributed organically by established users on their social media profiles. This not only increases your social authority but also increases your website traffic. By sharing an article they can curate better content on their streams and their readers.
For users to submit a new post in LnkSocial they have to come to the website and create a new post. We were getting a lot of posts every day and that made us think about creating a plugin which will let users to submit posts directly from their WordPress website. As soon as a post is published on the website it will go into LnkSocial.
Plugin Submission Experience
Since we were determined that we want to launch the plugin, we hired a WordPress developer, presented the idea of what we wanted and within few weeks of hard work our plugin was ready. After it was ready we had to take it to the WordPress Plugin Directory so our users can start taking advantage of it. Since it was our first WordPress plugin, we faced some challenges! We had to go back and forth between designing, developing and uploading the plugin. I will share my experience and all the steps I took to submit my first plugin to WordPress repository.
Tutorial: How To Add Your First Plugin To WordPress Repo
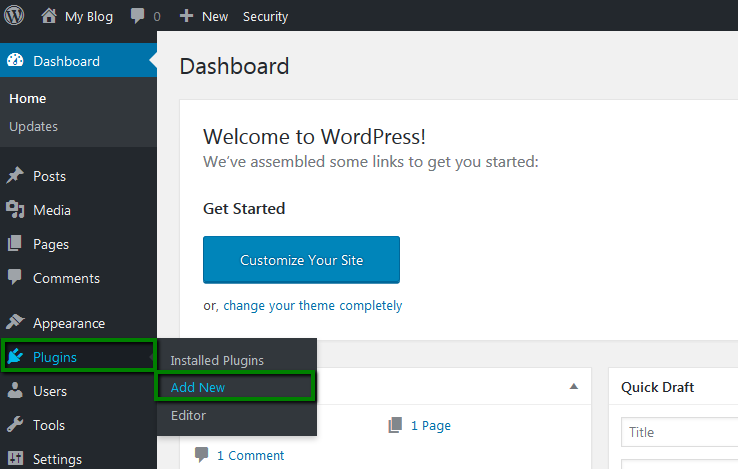
The first thing you need to get started is a plugin which is fully functional and will solve user’s problem. Once you have done that you are done with the hard part and rest is all pretty simple. To upload a plugin you will need to create a free WordPress account. If you are already registered you can go to add your plugin page and begin the process.
To upload your plugin you need to create a zip file which includes a readme.txt file, your plugin and an assets folder with all the images.
1. Readme.txt
Readme.txt is a very important file in the folder and will contain all the details about your plugin including the plugin name, contributor, website, plugin description, installation, FAQs and changelog. Here’s a sample ReadMe.txt file that you can use for your reference or alternatively you can use this plugin GenerateWP Plugin Readme Generator to generate your readme.txt file.
This is what my readme.txt looks like:
Once your readme.txt is ready, verify it with this official validator. When I did mine it gave me a note saying: “No == Upgrade Notice == section was found”. But upgrade note is not really necessary so I moved forward ignoring that note.
2. Assets Folder
Now its time to prepare your assets folder. This will include the screenshots of your plugin which are referenced in your readme.txt file. I have added three screenshots : Login Page For Plugin, Plugin’s Default Settings Page and Check box to allow/disallow submitting post To LnkSocial.
Banner: Along with the screen shots, you need to add banner images to the same folder. To do so create a banner image of exact size 772*250 and name it banner-772×250.png . For retina display, which is double the size, create an image of size 1554*500 and name it banner-1544×500.png. Move both the images to the assets folder.
Icon: Plugin icon should be 128*128 for normal icon and name it icon-128×128.png while for retina display icon should be 256*256 and named icon-256-256.png respectively.
3. Your Code/Plugin
Put your fully functional code file and give it an appropriate name. Mine is named ‘lnksocial’.
Once everything is put in place, zip the whole folder. Here is what my file structure looks like:
After your zip file is ready, archive it on your server or on an online storage space like Google Drive, Dropbox, etc. You need to do this step as you are required to submit the link to your archived file while uploading your plugin. Once you login into your WordPress account, go to this page to add your plugin.
You need to enter plugin name, plugin description and plugin URL. When you go to this page it give you the number of plugins that are in review queue. This is what you will see on screen:
It also warns you about selecting the plugin name as whatever you enter for the first time will become the slug for your plugin. You can change the name of the plugin, but you cannot change the slug so be careful while selecting the name. This is what it reads:
“Note that the plugin name you submit here will become the URL of the plugin in the directory. The name is not changeable later, so check your spelling and be sure that you get this form correct!”
When you submit the plugin, it will go into review queue and you will need to wait until you hear back from them. There is no math in how long will it take for them to review your plugin. Each plugin is manually reviewed by only two people and the review queue gets really back logged when both the reviews are traveling or busy.
After you send your plugin to review queue this is what your screen will look like:
I logged into my WordPress.Org account to check the status of my plugin. And there was nothing. Then I checked my inbox and found an email from them within 24 hours, saying that my plugin is rejected! I am really glad they gave me the reason for rejection and the good part was it was just a minor name change. Here’s the email I received from them.
It reads:
All I had to do was to not add the word “Plugin” in my plugin’s name as that would become the slug for my plugin. By default the URL will have “plugins” word in the slug and adding it in the name will redundant. So I repeated the same steps, just a minor name change, and this is what it looks like:
With this submission the number of plugins in the waiting queue had crossed 100. It was Friday, so I expected the reply by Monday which turned out right. I got an email with my plugin’s update saying it need to make some changes in the naming of functions and classes in the code so that it doesn’t conflict with other plugins. Here is what the email read:
After I received this email, I had my developer make necessary changes to the code and upload it on the server. It took him around 1 day to finish updating the code. Once that was done, I replied back to the email with the link to my plugin. Within 24 hours I received an email stating:
We made necessary changes and upload the plugin again. I received the response in 48 hours and yay, my plugin was approved!!
Once your plugin is approved, you will receive a response from the WordPress Plugin team, which looks something like this:
Next step is to get your plugin ready for the SVN repository. To that there are tools available:
Before we get started, I will briefly explain the folder structure. I have named the main folder “lnksocial-social-sharing”. Then in that folder are three subfolders: “branches”, “tags”, and “trunk”. This is how these folders are used:
- Branches: to release major updates,
- Tags: to release minor updates,
- Trunk: your beta version where you play with the new features.
So put your current version of the plugin in the trunk folder. The reason behind using these folders is you can revert back to the older version if there are any bugs found.
To get started with this process you need to begin by entering your WordPress.org’s login credentials and your unique SVN link you received from WordPress repo (in the email). Once you see the screen with your files, right-click on the folder name and click “SVN Checkout”.
This will let you save the directory on your local computer. So by doing this you are downloading a copy for yourself to make changes in the local folder. This is how the folder structure on your local PC will look like.
Upload all your images in the assets folder and your plugin files in the trunk folder. This is how my trunk folder looks like:
Whenever you are done with the changes, you can upload the file in the folder and checkin or commit the changes. This is how the screen will look once you commit the changes.
Remember to update your readme.txt file to notify of the changelog and update the stable version of your plugin. Once your plugin is updated you will get an email notification with the update message.
You can checkout the LnkSocial – Social Sharing Plugin here.
Update
While I was going this process of getting my plugin for LnkSocial.com approved, I developed a plugin “TweetShare – Click To Tweet” and uploaded it to the repository. In less than 24 hours I received a response from the WordPress Plugin team saying my plugin has been approved.
You can check out the TweetShare – Click To Tweet plugin here.