Apple’s iMessage is one of the most handy and useful features that people use with iPhones, iPads, iPod Touches and Mac computers. It is similar to Blackberry’s BBM service, but since it is capable of being used on all of the different Apple devices, the scope is much larger. You can send messages and pictures and all kinds of media through iMessage, making it a very popular interface for Apple users around the globe. First introduced with iOS 5, iMessage quickly became a very popular figure. However, it requires users to associate their device with an account, which will be used for connecting with others. You can easily add contacts through their email addresses. And, in this day and age, most people use more than one account for their daily needs. Infact I personally have my cell phone number, and one of my email addresses attached to it. The attaching email address come in handy when you are traveling abroad as you don’t have to activate roaming and can still receive your media files with a wifi connection over email attached to iMessage. So when I am traveling out of country I attach two email addresses – my personal and work email.
But before I move forward in showing you the steps I would like you to make sure that the second email address that you want to add as your additional iMessage email, is not an existing apple id. If its an exiting email id then you might now be able to add it to iMessage. So choose any other email domain which you frequently use. So that our prerequisites are over let’s get started.
1. Open Settings from the Home Screen of your iPhone/ iPad or iPod Touch.

iPhone Home Screen
2. On the Settings page scroll down further and you’ll see a section marked ‘Messages’. Tap on it.

iMessage Settings
3. Then, tap on the section that says ‘Send and Receive’. Right beside ‘Send and Receive’, you will see the different email addresses and/or phone number that are currently associated with your account.

Send and Receive iMessage
4. Tap “Add Another Email Address” under the section “You can be reached on iMessage at” section
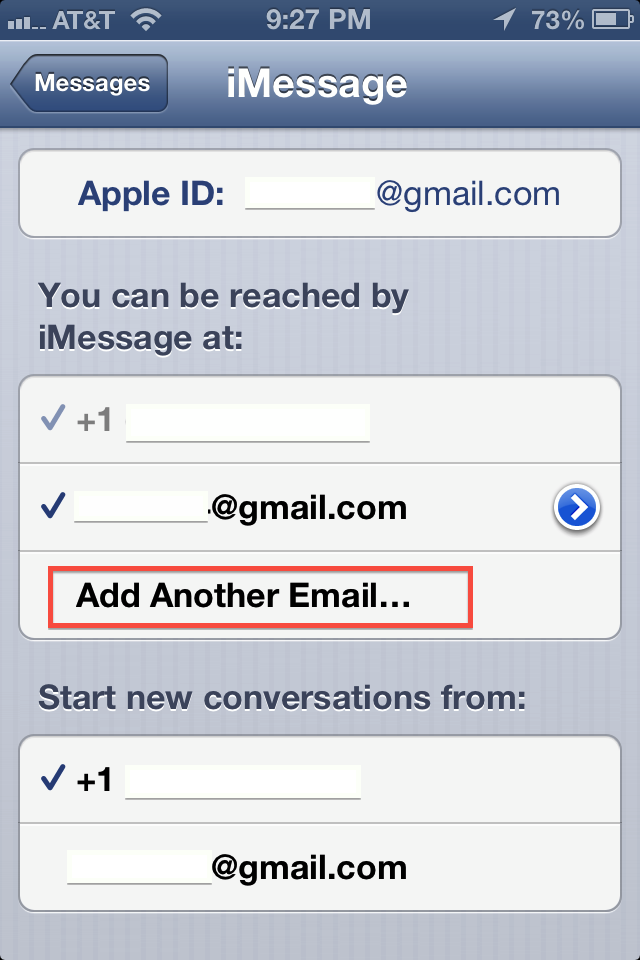
Email Address iMessage
Then, just type in your email address, and wait for Apple to send a verification email to your account. Once the verification email has been received and you have verified your account, you will be able to incorporate that email account with your iMessage account, making it easier for you to send and receive iMessages from more than one contact.
For most people, the option to divide email addresses is quite helpful, since rather than just using one email account, a lot of people divide their email accounts by work and family, so by using different accounts, you can keep in touch with everybody without having to make any compromises. The iMessage app has received a lot of public fame over the passage of time, and Apple has certainly marketed it well enough. With the help of Siri now, you can also dictate messages and make changes directly, providing additional convenience to your text messaging needs.
You might like – Outlook on iPhone/iPad